Saturday, February 25, 2017

SSIS File SystemTask to dynamically create a Folder, Copy and Rename a File

How to create create a Folder dynamically by Today date then Copy and Rename a file from Source using File System Task during Runtime in SSIS 
We can do this by using the File System Tasks as follows :
Phase-1 : Create a Source File Connection :
Here we have to Create a Connection for the Source File which we want copy.


Phase-2 : Create 4 Variables ( 1 Static and 3 Dynamic Variables ) as follows :
DestPath
DestiVar
DestFile
RenamDestFile


1.DestPath :  This is a Static Variable , to which we will assign the Destination Path ,to where we copy the File.
DestPath = "C:\Users\Tamatam\Desktop\SSIS\Dest1\"

2.DestiVar : This is a Dynamic Variable , to which the value will be defined using the Expression Builder, to Create a Folder with Current Date, in DestPath.
@[User::DestPath] +((DT_WSTR, 5)DATEPART("dd", GETDATE() ))+"-"+((DT_WSTR, 5)DATEPART("mm", GETDATE() ))+"-"+((DT_WSTR, 5)DATEPART("yyyy", GETDATE() ))+"\\"

The Expression result is as follows..
DestiVar = C:\Users\Tamatam\Desktop\SSIS\Dest1\25-2-2017\


3.DestFile: This is a Dynamic Variable , to which the value will be defined using the Expression Builder, to store the Destination File ( in the Destination created in above step using the variable DestiVar) which is the file coming from Source.
@[User::DestiVar]+"Dataset.xlsx"

The Expression result is as follows..
DestFile = C:\Users\Tamatam\Desktop\SSIS\Dest1\25-2-2017\Dataset.xlsx


4.RenamDestFile: This is a Dynamic Variable , to which the value will be defined using the Expression Builder, to rename the Destination File ( in the Destination created in above step using the variable DestiFile).

@[User::DestiVar]+ SUBSTRING( (DT_WSTR, 30) GETDATE(),1,10 )+".xlsx"

The Expression result is as follows..
RenamDestFileC:\Users\Tamatam\Desktop\SSIS\Dest1\25-2-2017\2017-02-25.xlsx


Now we have to Design the Control Flow with File System Tasks from the next Phase as follows....
---------------------------------------------------------------------------------------------------------------

Phase-3 : Add a first File System Task to Create Directory/Folder in Destination:
Set the Properties in File System Task Editor as follows...


Phase-4 : Add a second File System Task to Copy File from Source to Destination Folder created in above step :
Connect with above task1 then set the Properties in File System Task Editor as follows...


Phase-5 : Add a third File System Task to Rename the file in Destination Folder which Copied in above step :
Connect with above task2 then set the Properties in File System Task Editor as follows...


Final Phase-6 :  Now the Package with all the Tasks is ready :
Keep all the Task in one Sequence container and run as follows.......... 


Output :

Dynamic Folder Created in Destination with Today Date :

Renamed the file "Dataset.xlsx" in Destination>Date Folder with Today Date :

Other Notes :
(DATEPART("dw", GETDATE() ) == 1 ? "Sunday" : (DATEPART("dw", GETDATE() ) == 2 ? "Monday" : (DATEPART("dw", GETDATE() ) == 3 ? "Tuesday" : (DATEPART("dw", GETDATE() ) == 4 ? "Wednesday" : (DATEPART("dw", GETDATE() ) == 5 ? "Thursday" : (DATEPART("dw", GETDATE() ) == 6 ? "Friday" : "Saturday"))))) ) 

Expression will result the WeekDay Name as "Saturday"

-------------------------------------------------------------------------------------------------------- 
Thanks, TAMATAM ; Business Intelligence & Analytics Professional 
--------------------------------------------------------------------------------------------------------

Friday, February 24, 2017

SSIS File SystemTask to create an Excel File dynamically from a SQL Query or Table during Runtime

How to create an Excel File dynamically from a SQL Query or Table Data using File System Task during Runtime in SSIS 
Suppose If you want to create an Excel File dynamically every time during run time and update the data from a SQL Table to this Excel File using SSIS, you can do it simply by using the File System Task and Data Flow Task with Execute SQL Tasks as follows :

Phase-1 : Add a Data Flow Task to Control Flow :


Phase-2 : Create the 3 connections ; one for OLEDB Source, one for Excel Destination and another for the File System task :

1.OLEDB Souce : The connection for the Source table from which we want to update the data to excel destination. 
Eg : MyDbCon

2.Excel Destination : The connection for the Destination Excel file in which we want to update the data from Source table.

Eg : EmpDtls

3.File Connection : The connection for the same Destination Excel file which we want to delete and create every time during run time .

Eg : FileEmpDtls

Phase-3 : Go inside the Data flow task and add the OLE DB Source:

In the OLE DB Source Editor choose the Connection Manager and Table or View 
(You can choose SQL Command as well )


Phase-4 : Next add the Excel Destination and connect to the OLE DB Source:


Phase-5 : Next in the Excel Destination Editor do the following things:

1.Select Excel Connection Manager that you created in the begining
2.At the Name of the Excel Sheet , Don't choose any thing, simply click the Next button.
3.Click OK on any Warning/Info message box popups
4.Now it will generate an SQL Script based on your Source Table/Query as follows:

CREATE TABLE `EmpData` (

    `Emp_Id` INT,
    `Emp_Name` NVARCHAR(255),
    `Gender` NVARCHAR(255),
    `Job_Id` INT,
    `Dept_Id` INT,
    `Joining_Date` DATE,
    `Basic_Sal` DOUBLE PRECISION,
    `Dept_Name` NVARCHAR(255)
                       )
Here you can also select only the no.of columns you want in destination.


5. You can change the Table name as you wish, which will be created in your Excel Destination as Tab,once you click OK.


Phase-6 : Next select the Name of Excel sheet which is created dynamically from Source Table , and do the column Mappings...


Now if you want to check , go to your Excel Destination file where you can see the same table created with structure as shown below :


Now the Data flow task is ready.


Phase-7 : Next we have to add the Execute SQL Task and connect that with 
Data Flow task.
Next set the Connection Type property as Excel then define the SQL Query to create an excel file during run time before executing the Data Flow task.

Inside the Control Flow .....


Phase-8 : Next we have to add the File System Task and connect that with  Execute SQL Task.
Next in the File System Task Editor set the Operation property as Delete File to delete the file before the Execute SQL Task create an excel file during run time.


Final Phase-9 : Now the whole SSIS Task is ready and it works as follows :
1.First the File System Task will delete the destination File.
2. Next Execute SQL Task will create a Destination Excel file during run time.
3.Finally Data Flow task , designed in the beginning, will execute the inside defined Execute SQL Task that transfers the data to Excel Destination.


Output in Destination file :

Please Note :
Every time a new file will be created with the same name by deleting the existing one.
You can use the Multi-Cast/Conditional Split Transformations here in the Data Flow to transfer the same Input with different Select list to Multiple Destinations/Sheets, based on your Conditions and requirement.

--------------------------------------------------------------------------------------------------------
Thanks, TAMATAM ; Business Intelligence & Analytics Professional
--------------------------------------------------------------------------------------------------------

SSIS Data Flow Task to Append the Data to an Excel File from a SQL Query or Table

How to Append a SQL Query or Table Data to an Excel File in SSIS
Suppose If you want to append the Data on a Periodical basis from a SQL Table to an Excel File using SSIS, you can do it simply by using Data Flow Task as follows :

Phase-1 : Add a Data Flow Task to Control Flow :


Phase-2 : Create the 2 connections ; one for OLEDB Source, another for Excel Destination:
1.OLEDB Souce : The connection for the Source table from which we want to append the data to excel destination. 
Eg : MyDbCon

2.Excel Destination : The connection for the Destination Excel file in which we want to append the data from Source table.

Eg : EmpDtls

Phase-3 : Go inside the Data flow task and add the OLE DB Source:

In the OLE DB Source Editor choose the Connection Manager and Table or View 
(You can choose SQL Command as well )

Phase-4 : Next add the Excel Destination and connect to the OLE DB Source:


Phase-5 : Next in the Excel Destination Editor do the following things:

1.Select Excel Connection Manager that you created in the begining
2.At the Name of the Excel Sheet , Don't choose any thing, simply click the Next button.
3.Click OK on any Warning/Info message box popups
4.Now it will generate an SQL Script based on your Source Table/Query as follows:

CREATE TABLE `EmpData` (

    `Emp_Id` INT,
    `Emp_Name` NVARCHAR(255),
    `Gender` NVARCHAR(255),
    `Job_Id` INT,
    `Dept_Id` INT,
    `Joining_Date` DATE,
    `Basic_Sal` DOUBLE PRECISION,
    `Dept_Name` NVARCHAR(255)

)

Here you can also select only the no.of columns you want in destination.


5. You can change the Table name as you wish, which will be created in your Excel Destination as Tab,once you click OK.


Phase-6 : Next select the Name of Excel sheet which is created dynamically from Source Table , and do the column Mappings...


Now if you want to check , go to your Excel Destination file where you can see the same table created with structure as shown below :


Now the Data flow task is ready.

Final Phase-7 : Next run the Data Flow Task and see the output in Destination.


Inside the Data Flow .....

Output in Destination file :


Please Note :

How many Times you run this Task, those many times data will be appended in the same Destination. It will not override any thing.

You can use the Multi-Cast Transformation here in the Data Flow to transfer the same Input with different Select list to Multiple Destinations/Sheets, based on your requirement.

-------------------------------------------------------------------------------------------------------- 
Thanks, TAMATAM ; Business Intelligence & Analytics Professional 
--------------------------------------------------------------------------------------------------------

Wednesday, February 22, 2017

How to Update a Table by Joining with another Map Table using Sub Query in SQL Server

T-SQL Sub Query  to update a Table by Joining with another map Table in SQL Server
USE [TAMATAM]
GO
UPDATE  [TBL_Trans]
SET Week_Num= WK_Number
FROM
(
SELECT DISTINCT 'W'+CONVERT(VARCHAR,C.WK_Num) WK_Number,T.Week_Id  FROM            [TBL_Trans] T  JOIN   [TBL_Calendar] C
ON T.Week_Id=C.WK_Id AND C.[FY_QTR] =T.[QTR]
       ) S1
WHERE  [TBL_Trans].Week_Id=S1.Week_Id

Example :
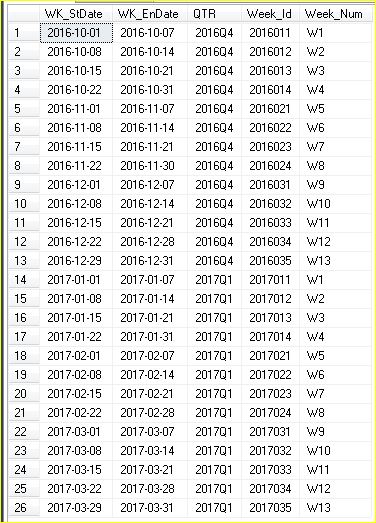
Lets suppose we have a Table called   [TBL_Trans] as follows , where we want to update the 'Week_Num' by mapping with another table called [TBL_Calendar] 

SELECT*FROM [TBL_Trans];


SELECT*FROM [TBL_Calendar];


Now we can update the [Week_Num] column of  [TBL_Trans] by Joining with the map table [TBL_Calendar] :based on the key Column 'Week_Id' as follows :

UPDATE  [TBL_Trans]
SET Week_Num= WK_Number
FROM
(
SELECT DISTINCT 'W'+CONVERT(VARCHAR,C.WK_Num) WK_Number,T.Week_Id  FROM            [TBL_Trans] T  JOIN   [TBL_Calendar] C
ON T.Week_Id=C.WK_Id AND C.[FY_QTR] =T.[QTR]
       ) S1
WHERE  [TBL_Trans].Week_Id=S1.Week_Id

Ouput :

-------------------------------------------------------------------------------------------------------- 
Thanks, TAMATAM ; Business Intelligence & Analytics Professional 
--------------------------------------------------------------------------------------------------------

Tuesday, February 21, 2017

How to keep only dynamic number of rolling Quarters data in a Table of SQL Server

T-SQL Query to Keep only 9 Rolling Quarters Data in a Table of 3 Years Data in SQL Server
Suppose we have Table called [dbo].[Tbl_Transaction] with Data for 3 consecutive Years of 2016,2017,2018...which are dynamic in nature, and the data is Summarized by Week and Month at lower level and by Quarter and Year at higher level as follows :
2016Q1,2016Q2,2016Q3,2016Q4
2017Q1,2017Q2,2017Q3,2017Q4
2018Q1,2018Q2,2018Q3,2018Q4

USE [TAMATAM]
GO

SELECT DISTINCT [FY_QTR],[FY] FROM [dbo].[Tbl_Transaction] 
GO


Now out of this Dynamic 3 consecutive Years data, we need to Keep only latest 9 Rolling Quarters data .... ( 2016Q4,2017Q1,2017Q2,2017Q3,2017Q4,2018Q1,2018Q2,2018Q3,2018Q4..)
dynamically and need to delete the Historical Quarters which are not needed.
/*
Declaring the 2 Variables , one to store the Total no.of Quarters Count and another to store the Count of Quarters which are to Delete from the Source data as follows...
*/
DECLARE @@Total_Qtrs AS INT, @Qtrs_to_Delete as INT

SELECT @@Total_Qtrs=COUNT(DISTINCT FY_QTR) FROM [dbo].[Tbl_Transaction] 
PRINT(@@Total_Qtrs)
;

/ *
Checking whether the Source data has 9 Rolling Quarters data or Not.
If the Data has more than 9 Quarters the find the Quarters Count to delete
*/
IF(@@Total_Qtrs<9)
BEGIN
PRINT 'We Dont Have 9 Rolling Quarters Data in the Source' ;
END
ELSE
BEGIN
SET @Qtrs_to_Delete= (@@Total_Qtrs-9)
END

PRINT(@Qtrs_to_Delete)
;
--To Select the Historical Quarters Data that you want to Delete from Table
SELECT * from 
    (
        SELECT [FY_QTR],[FY], DENSE_RANK()OVER(ORDER BY FY_QTR) AS QTR_Rank             FROM [dbo].[Tbl_Transaction] 
    )S1
    WHERE S1.QTR_Rank <=@Qtrs_to_Delete
;

--Now we can Delete the Unwanted Quarters Data by Defining the above Query in CTE(Common Table Expressions)

WITH MyCTE AS
(
SELECT * from 
    (
SELECT [FY_QTR],[FY], DENSE_RANK()OVER(ORDER BY FY_QTR) AS QTR_Rank  FROM [dbo].[Tbl_Transaction] 
    )S1
WHERE S1.QTR_Rank <=@Qtrs_to_Delete
)
DELETE From MyCTE
SELECT DISTINCT [FY_QTR],[FY]  FROM [Tbl_Transaction] 
;
GO

Final Output :

-------------------------------------------------------------------------------------------------------- 
Thanks, TAMATAM ; Business Intelligence & Analytics Professional 
--------------------------------------------------------------------------------------------------------

Monday, February 20, 2017

How to Check whether a Year is Leap Year or not in SQL Server

T-SQL Query or Scalar User Defined Function to Check a whether Year is Leap Year or not in SQL Server
USE TAMATAM
GO
-------------------------------------------------------------------
Method-I : SQL Query
-------------------------------------------------------------------
DECLARE @Year as INT , @Days_in_Feb as INT
SET @Year=2018 --Pass your Year That you want to Check
SET @Days_in_Feb=DAY(EOMONTH(CONCAT(@Year,'0201')))

--SET @Days_in_Feb =DATEPART(DD,(EOMONTH(CONCAT(@year,'0201'))))

IF @Days_in_Feb=29
  BEGIN
       Print 'Its a Leap Year'
  END

ELSE
 BEGIN
       Print 'Its a Non-Leap Year'
 END
 GO
-------------------------------------------------------------------
Method-II : Scalar User Defined Function
-------------------------------------------------------------------
DROP FUNCTION IsLeapYear;
GO

--Creating the Function to Check whether the Year is a Leap Year or Not
--Function returns an Integer output as True(1) or False(0)

CREATE FUNCTION dbo.IsLeapYear (@year INT)
RETURNS INT
AS
BEGIN
             RETURN( IIF( DAY(EOMONTH(CONCAT(@Year,'0201'))) = 29,1,0 ))
END
GO

--Executing the Function
SELECT dbo.IsLeapYear('2016') 'IsLeapYear';
SELECT dbo.IsLeapYear('2018') 'IsLeapYear';
GO
-------------------------------------------------------------------
Method-III : Scalar User Defined Function
-------------------------------------------------------------------
DROP FUNCTION IsLeapYear ;
GO

--Creating the Function to Check whether the Year is a Leap Year or Not
--Function returns a Varchar output as True('Leap Year') or False('Non Leap Year')

CREATE FUNCTION dbo.IsLeapYear (@Year INT)
RETURNS VARCHAR(50)
AS
BEGIN
     RETURN(IIF(DAY(EOMONTH(CONCAT(@Year,'0201'))) = 29,'Leap Year',
'Non Lear Year'))
END
GO

--Executing the Function
SELECT dbo.IsLeapYear('2016') 'IsLeapYear';
SELECT dbo.IsLeapYear('2018') 'IsLeapYear';
GO
-------------------------------------------------------------------------------------------------------- 
Thanks, TAMATAM ; Business Intelligence & Analytics Professional 
--------------------------------------------------------------------------------------------------------

Sunday, February 19, 2017

How to use Intersect and Except Operators in SQL Server

SQL Server Intersect and Except Operators Definition with Examples
INTERSECT operator to return only values that match within both data sets. The data that is common to both results set; the common data is represented by the area where the two circles intersect as shown in below image.

The EXCEPT operator reruns the data that exists in one of the data set, which is not exist in the another data set which is outside the intersecting area. 
For instance, if Set A is specified to the left of the EXCEPT operator, only returns the values from Set A which are not in Set B, as shown in below image.


When you use the INTERSECT operator or EXCEPT operator, the number of columns must be the same in both queries and the columns must be in the same order. In addition, the corresponding columns between the queries must be configured with compatible data types. 

In the illustration above, that would be the data in the left circle, outside the section where the two data sets intersect. The following points sum up which operator to use to return different combinations of data:

To return the data in Set A that doesn’t overlap with B, use A EXCEPT B.
To return only the data that overlaps in the two sets, use A INTERSECT B.
To return the data in Set B that doesn’t overlap with A, use B EXCEPT A.
To return the data in all three areas without duplicates, use A UNION B.
To return the data in all three areas, including duplicates, use A UNION ALL B.
To return the data in the non-overlapping areas of both sets, use (A UNION B) EXCEPT(A INTERSECT B), or perhaps (A EXCEPT B) UNION (B EXCEPT A)

Example :
Let us suppose we have two tables with Common structure , data and unique records in each table as well as follows :
SELECT*FROM [dbo].[Tbl_Left]
SELECT*FROM [dbo].[Tbl_Right]

-----------------------------------------------------------
Now we can return the the records from Left Table(first table) which are not exist in the Right table(second table) as follows :

SELECT*FROM [dbo].[Tbl_Left]
Except
SELECT*FROM [dbo].[Tbl_Right]

-----------------------------------------------------------
Similarly, we can return the the records from Right Table(second table) which are not exist in the Left table(first table) as follows :

SELECT*FROM [dbo].[Tbl_Right]
         Except
 SELECT*FROM [dbo].[Tbl_Left]

-----------------------------------------------------------
Now we can return the Intersecting records that exist in both the Left Table(first table) and Right table(second table) as follows :

SELECT*FROM [dbo].[Tbl_Left]
INTERSECT
SELECT*FROM [dbo].[Tbl_Right]


-------------------------------------------------------------------------------------------------------
Thanks, TAMATAM ; Business Intelligence & Analytics Professional
--------------------------------------------------------------------------------------------------------

Featured Post from this Blog

How to compare Current Snapshot Data with Previous Snapshot in Power BI

How to Dynamically compare two Snapshots Data in Power BI Scenario: Suppose, we have a sample Sales data, which is stored with Monthly Snaps...

Popular Posts from this Blog