How to Append a SQL Query or Table Data to an Excel File in SSIS
Suppose If you want to append the Data on a Periodical basis from a SQL Table to an Excel File using SSIS, you can do it simply by using Data Flow Task as follows :
Phase-1 : Add a Data Flow Task to Control Flow :

Phase-2 : Create the 2 connections ; one for OLEDB Source, another for Excel Destination:
1.OLEDB Souce : The connection for the Source table from which we want to append the data to excel destination.
Eg : MyDbCon
2.Excel Destination : The connection for the Destination Excel file in which we want to append the data from Source table.
Eg : EmpDtls

Phase-3 : Go inside the Data flow task and add the OLE DB Source:
In the OLE DB Source Editor choose the Connection Manager and Table or View
(You can choose SQL Command as well )

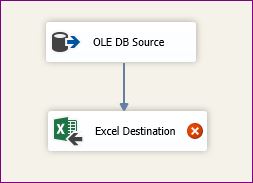
Phase-4 : Next add the Excel Destination and connect to the OLE DB Source:
Phase-5 : Next in the Excel Destination Editor do the following things:
1.Select Excel Connection Manager that you created in the begining
2.At the Name of the Excel Sheet , Don't choose any thing, simply click the Next button.
3.Click OK on any Warning/Info message box popups
4.Now it will generate an SQL Script based on your Source Table/Query as follows:
CREATE TABLE `EmpData` (
`Emp_Id` INT,
`Emp_Name` NVARCHAR(255),
`Gender` NVARCHAR(255),
`Job_Id` INT,
`Dept_Id` INT,
`Joining_Date` DATE,
`Basic_Sal` DOUBLE PRECISION,
`Dept_Name` NVARCHAR(255)
)
Here you can also select only the no.of columns you want in destination.

5. You can change the Table name as you wish, which will be created in your Excel Destination as Tab,once you click OK.
Phase-6 : Next select the Name of Excel sheet which is created dynamically from Source Table , and do the column Mappings...

Now if you want to check , go to your Excel Destination file where you can see the same table created with structure as shown below :

Now the Data flow task is ready.
Final Phase-7 : Next run the Data Flow Task and see the output in Destination.
Suppose If you want to append the Data on a Periodical basis from a SQL Table to an Excel File using SSIS, you can do it simply by using Data Flow Task as follows :
Phase-1 : Add a Data Flow Task to Control Flow :

Phase-2 : Create the 2 connections ; one for OLEDB Source, another for Excel Destination:
1.OLEDB Souce : The connection for the Source table from which we want to append the data to excel destination.
Eg : MyDbCon
2.Excel Destination : The connection for the Destination Excel file in which we want to append the data from Source table.
Eg : EmpDtls

Phase-3 : Go inside the Data flow task and add the OLE DB Source:
In the OLE DB Source Editor choose the Connection Manager and Table or View
(You can choose SQL Command as well )

Phase-4 : Next add the Excel Destination and connect to the OLE DB Source:
Phase-5 : Next in the Excel Destination Editor do the following things:
1.Select Excel Connection Manager that you created in the begining
2.At the Name of the Excel Sheet , Don't choose any thing, simply click the Next button.
3.Click OK on any Warning/Info message box popups
4.Now it will generate an SQL Script based on your Source Table/Query as follows:
CREATE TABLE `EmpData` (
`Emp_Id` INT,
`Emp_Name` NVARCHAR(255),
`Gender` NVARCHAR(255),
`Job_Id` INT,
`Dept_Id` INT,
`Joining_Date` DATE,
`Basic_Sal` DOUBLE PRECISION,
`Dept_Name` NVARCHAR(255)
)
Here you can also select only the no.of columns you want in destination.

5. You can change the Table name as you wish, which will be created in your Excel Destination as Tab,once you click OK.
Phase-6 : Next select the Name of Excel sheet which is created dynamically from Source Table , and do the column Mappings...

Now if you want to check , go to your Excel Destination file where you can see the same table created with structure as shown below :

Now the Data flow task is ready.
Final Phase-7 : Next run the Data Flow Task and see the output in Destination.

Inside the Data Flow .....


Please Note :
How many Times you run this Task, those many times data will be appended in the same Destination. It will not override any thing.
You can use the Multi-Cast Transformation here in the Data Flow to transfer the same Input with different Select list to Multiple Destinations/Sheets, based on your requirement.
--------------------------------------------------------------------------------------------------------
Thanks, TAMATAM ; Business Intelligence & Analytics Professional
--------------------------------------------------------------------------------------------------------


No comments:
Post a Comment
Hi User, Thank You for visiting My Blog. If you wish, please share your genuine Feedback or comments only related to this Blog Posts. It is my humble request that, please do not post any Spam comments or Advertising kind of comments, which will be Ignored.