The Power BI Calculation Groups are one of the feature of Power BI that reduces redundant measures creation by grouping the standard measure expressions as calculation items. The Calculation group is like a table with DAX expressions for each of the calculation items.
Currently the Calculation groups cannot be created directly in Power BI, however we can create them by using an external tool called 'Tabular Editor'.
The Calculation groups can apply specific calculations on top of the existing DAX measures that shares the common logic.
Currently the Calculation groups cannot be created directly in Power BI, however we can create them by using an external tool called 'Tabular Editor'.
The Calculation groups can apply specific calculations on top of the existing DAX measures that shares the common logic.
The dynamic DAX function "SELECTEDMEASURE()" will help to to create calculation groups by acting as a place holder for the selected base measure to pass on to dependent DAX measures.
For instance, the calculation groups can be used in Time intelligence calculations like year-to-date, year-over-year, without having to write many different variations of the base measures.
Scenario:
Lets suppose we have a Power BI Model as follows:
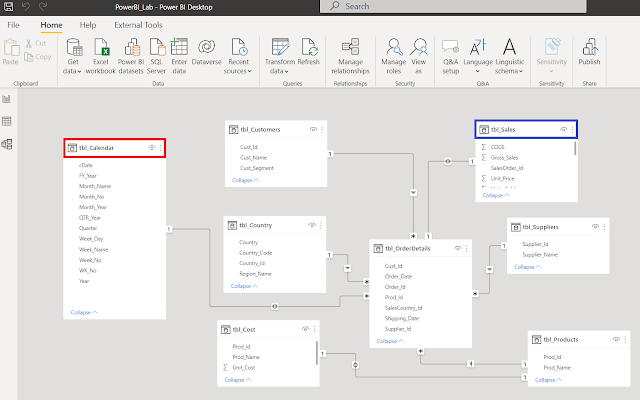
Based on the above Model, from the table, tbl_Sales , I have created a set of Measures to show the YoY Sales and YoY Cost details.

Here we just replicated same logic for both Sales and Cost, with different underlying fields. 
Before, we creating the Measure Groups, lets have a quick look at the logic of the Measures used in YoY Sales calculations:
CY_Sales = SUM(tbl_Sales[Gross_Sales])
PY_Sales = CALCULATE([CY_Sales], SAMEPERIODLASTYEAR(tbl_Calendar[cDate]))
YoY_Sales = VAR CurPeriod_Value = [CY_Sales]
VAR PrevPeriod_Value = CALCULATE([CY_Sales],SAMEPERIODLASTYEAR(tbl_Calendar[cDate]))
VAR Result = SWITCH(TRUE(),
OR(ISBLANK(PrevPeriod_Value),ISBLANK(CurPeriod_Value)),BLANK(),
CurPeriod_Value-PrevPeriod_Value)
RETURN Result
YoY_Sales% =
VAR CurPeriod_Value = [CY_Sales]
VAR PrevPeriod_Value =
CALCULATE([CY_Sales], SAMEPERIODLASTYEAR(tbl_Calendar[cDate]))
VAR YoY_Value = SWITCH(TRUE(),
OR(ISBLANK(PrevPeriod_Value),ISBLANK(CurPeriod_Value)),BLANK(),
CurPeriod_Value-PrevPeriod_Value)
VAR Result = DIVIDE(YoY_Value,PrevPeriod_Value)
RETURN Result
Similarly, a set of Measures also created for the Cost using the filed, tbl_Sales[COGS].
# ------------------------------------------------------------------------------------------------------------------------ #
Now lets have a look at creating a common Measure Groups in this Scenario as per below.
Step 1: Launch a Tabular Editor from Power BI External Tools
We can launch the Tabular Editor directly from External Tools menu of the Power BI, or we can open the Tabular Editor and Connect to the Model of current instance of the Power BI.


Step 2: From Model > Tables > Create a new 'Calculation Group' :
Create a new Calculation Group by right clicking on the Tables.

By default it creates a New Calculation Group, with 'Calculation Items' and a 'Name'. These can be renamed as per our requirement.

Step 3: Create the required Measures under Calculation Items:
Now lets re-write the above measures with by applying the logic Calculation Groups logics by using the dynamic SELCTEDMEASURE() Function.
This measure acts as a place holder for the measure that selected in the current context.
Cur_Value = SELECTEDMEASURE()
PY_Value =
CALCULATE (SELECTEDMEASURE (), SAMEPERIODLASTYEAR ( tbl_Calendar[cDate] ))
YoY_Value =
VAR CurPeriod_Value = SELECTEDMEASURE ()
VAR PrevPeriod_Value =
CALCULATE (SELECTEDMEASURE (), SAMEPERIODLASTYEAR( tbl_Calendar[cDate] ))
VAR Result =
SWITCH (
TRUE (),
OR ( ISBLANK ( PrevPeriod_Value ), ISBLANK ( CurPeriod_Value ) ), BLANK (),
CurPeriod_Value - PrevPeriod_Value
)
RETURN
Result
YoY% =
VAR CurPeriod_Value = SELECTEDMEASURE ()
VAR PrevPeriod_Value =
CALCULATE(SELECTEDMEASURE (), SAMEPERIODLASTYEAR( tbl_Calendar[cDate] ))
VAR YoY_Value =
SWITCH (
TRUE (),
OR ( ISBLANK ( PrevPeriod_Value ), ISBLANK ( CurPeriod_Value ) ), BLANK (),
CurPeriod_Value - PrevPeriod_Value
)
VAR Result =
DIVIDE ( YoY_Value, PrevPeriod_Value )
RETURN
Result

When we completed the calculation items definition, Click save to apply the changes to the Model.
Notes :
I have renamed the default Calculation Group name as "Time_Intelligen_Group", and named the common place holder field as "Intelligen_Field".
The 'Ordinal' property of the Calculation Item(Measure) represents the order of display, when we use that in Power BI.
The default ordinal value for a measure is '-1', and it starts from 0. We have specified 0 for first measure (Cur_Value), 1 for second measure(PY_Value) and so on. We can change the order as per our requirement.We can change the display format of the numbers from 'Format String Expression' option. We used the format ""0.00%" for the measure YoY %, and its ordinal value is 3.
Step 4: Save Changes back to the Model :
Since we have connected to the local instance of Power BI, we can simply click Save in the Tabular Editor, which saves the changes to the connected model.
Suppose if we connected to a Dataset from Power BI Service, using XMLA End Point method, then we need to deploy(from Model>Deploy) the changes back to the Data Model.
When we comeback to the Power Report, in the same session, it will ask for 'Refresh now' to reflect the calculation groups in to the Model.
Please note that this 'Refresh now' will only refresh the Model meta data.

Now we can see a Calculation Group table will be populated with one place holder Field.
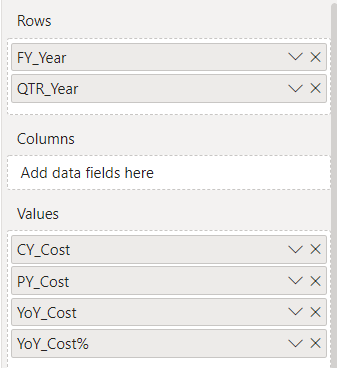
Final Step : Use the Calculation Group Field into the Visuals:
Finally, we can use the Measure Group field 'Intelligen' in the Column section of our visuals to apply the calculation items over the selected the measure.
# Output:


# ------------------------------------------------------------------------------------------------------------------------ #
Notes:
We can also use the Calculation Items directly in our Measures as per below:CY_Sales = SUM(tbl_Sales[Gross_Sales])
PY_Sales = CALCULATE([CY_Sales], Time_Intelligen_Group[Intelligen_Field]="PY_Value")
YoY_Sales = CALCULATE([CY_Sales],Time_Intelligen_Group[Intelligen_Field]="YoY_Value")
YoY_Sales% = CALCULATE( [CY_Sales],Time_Intelligen_Group[Intelligen_Field]="YoY%")
#Result:

# ------------------------------------------------------------------------------------------------------------------------ #
Notes ::
How to get the Local instance and port details of the local Power BI Instance :
We can find local instance and port number of a Power BI session from the following folder :
C:\Users\[username]\Microsoft\Power BI Desktop Store App\AnalysisServicesWorkspaces\
Example:
Each time when you open a Power BI, a local analysis workspace instance will be created.In this workspace we can find port number and other details of the instance like below:
C:\Users\[username]\Microsoft\Power BI Desktop Store App\AnalysisServicesWorkspaces\ AnalysisServicesWorkspace_82ba3c89-5900-4608-9819-b4f24359fda8\Data

The port number can be found from a text file called "msmdsrv.port". The port number and the Workspace instance names will be randomly changing from session to session.

TPREDDY-PC\AnalysisServicesWorkspace_82ba3c89-5900-4608-9819-b4f24359fda8
The name of the Database can be found from the XML file name, which looks like :
041038eb-deb3-487c-a1a9-009b3b0f0014.0.db
The complete Analysis Services instance name will be looks like as follows in Tabular Editor:
TPREDDY-PC\AnalysisServicesWorkspace_82ba3c89-5900-4608-9819-b4f24359fda8. 041038eb-deb3-487c-a1a9-009b3b0f0014

# ------------------------------------------------------------------------------------------------------------------------ #
Notes ::
How to connect to the Dataset(s) in a Power BI Service(Premium Workspace):
We can connect Tabular Editor to the Dataset(s) in Power BI Service using the XMLA end point. Also, we connect from the SQL Server Management Studio to the Analysis Service instance using the below XMLA endpoint connection string.
Connection String for Premium Workspace :
The below XMLA endpoint connection for workspace can be found in the Workspace settings. The Workspace must be under Premium Capacity.
Data Source=powerbi://api.powerbi.com/v1.0/myorg/[WorkspaceName]
or
Data Source=powerbi://api.powerbi.com/v1.0/[Tenant]/[WorkspaceName]
Connection String for Dataset :
Data Source=powerbi://api.powerbi.com/v1.0/myorg/[WorkspaceName];Initial Catalog=[PowerBI_Dataset]
In Tabular Editor, if we wants to read data from existing data Model and deploy changes back to Model in Power BI Service with use of XMLA Connection string, we needs to enable some settings in the Power BI Service as shown below.
To enable read-write for a Premium capacity :
- Click Settings > Admin portal.
- In the Admin portal, select Capacity settings > Power BI Premium > capacity name.
- Expand Workloads. In the XMLA Endpoint setting, select Read Write.
- The XMLA Endpoint setting applies to all workspaces and datasets assigned to the capacity.
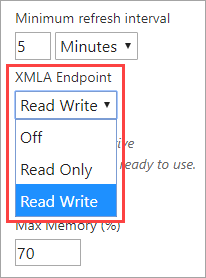
- Click Settings > Admin portal.
- In the Admin portal, select Premium Per User.
- Expand Dataset workload settings. In the XMLA Endpoint setting, select Read Write.
--------------------------------------------------------------------------------------------------------
Thanks, TAMATAM ; Business Intelligence & Analytics Professional
--------------------------------------------------------------------------------------------------------


No comments:
Post a Comment
Hi User, Thank You for visiting My Blog. If you wish, please share your genuine Feedback or comments only related to this Blog Posts. It is my humble request that, please do not post any Spam comments or Advertising kind of comments, which will be Ignored.