Visualize data with Histogram using the Functions of ggplot2 Package in R
The Histogram is used to visualize and study the frequency distribution of a univariate(one quantitative variable).The histogram is the foundation of univariate descriptive analytics.
>library(dplyr)
Basic Study of the Data


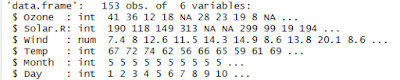
> str(airquality) # Structure of the dataset

>ggplot(data=airquality, aes(Temp)) + geom_histogram()

>qplot(airquality$Temp,
geom="histogram",
binwidth = 0.75,
main = "Histogram of Temp Freq Distribution",
xlab = "Temperature",
ylab = "Frequency",
fill=I("blue"),
col=I("red"),
alpha=I(0.5),
xlim=c(55,100) )
Notes:
The I() function inhibits the interpretation of its arguments. In this case, the col argument is affected. Without it, the qplot() function would print a legend, saying that "col = 'red' ".
Creating a Histogram for the variable Temp (airquality$temp) using ggplot() function :
Notes :
We can adjust the bin width with breaks.

Adding the Bin Count in the Histogram :
col="blue",
alpha = 0.5) +
aes(fill=..count..) +
scale_fill_gradient("Freq.legend", low = "yellow", high = "red") +
labs(title="Histogram of Temp Freq Distribution") +
theme(plot.title = element_text(hjust = 0.5))+
labs(x="Temperature", y="Frequency") +
xlim(c(55,100)) +
ylim(c(0,12))
Adding the Trend line on Histogram with Density :We will use the aes(y=..density..) function inside the geom_histogram() function to add the Density values on y-axis, instead of the Frequency/Count.
Next we will add the geom_density(col="purple") function to add a trend line of purple color over bins.
>ggplot(data=airquality, aes(Temp)) +
geom_histogram(aes(y =..density..),
breaks=seq(55, 100, by = 1.0),
col="blue",
fill="yellow",
alpha = 0.5) +
geom_density(col="purple")+
labs(title="Histogram of Temp Freq Distribution") +
theme(plot.title = element_text(hjust = 0.5) ) +
labs(x="Temperature", y="Density") +

Frequency Histogram :
The vertical scale of a 'frequency histogram' shows the number of observations in each bin. Optionally, we can also put numerical labels top of each bar that show how many individuals it represents.

From above, we know that the tallest bar has 30 observations, so this bar accounts for the relative frequency (30/100)=0.3 of the observations. The width of this bar is 10, its density is 0.03 and its area is 0.03(10)=0.3.
The density curve(trend line) of the distribution Norm(100,15) is shown on the histogram. The area beneath this density curve is also 1.(By definition, the are beneath the density function is always 1.)
 Notes:
The Histogram is used to visualize and study the frequency distribution of a univariate(one quantitative variable).The histogram is the foundation of univariate descriptive analytics.
It can be used to visualize the data that previously summarized in either a frequency, relative frequency, or percent frequency distribution.
A Histogram can be constructed by placing the variable of interest on x-axis, and the frequency on the y-axis. The frequency of each class(range of values divided into buckets on the x-axis) are shown by the vertical rectangular bars.
The width of the bars is determined by the class limits on the x-axis and the height of the bar is the corresponding frequency distribution.A Histogram can be constructed by placing the variable of interest on x-axis, and the frequency on the y-axis. The frequency of each class(range of values divided into buckets on the x-axis) are shown by the vertical rectangular bars.
In R, the histogram can be created using the hist() function R base package "graphics". We can also make a histogram using qplot() and ggplot() functions of ggplot2, “a plotting system for R, based on the grammar of graphics”. This post will focus only on making a Histogram with ggplot2 Package.
Example :
Example :
We will use the R's airquality dataset (airquality {datasets}) , to visualize with Histogram using the functions of ggplot2 Package.
This dataset shows the Daily air quality measurements for the variables Temperature, Wind, Ozone, Solar in a City for the period from May to September.
In our example, we focus on (the study of interest) only the Temperature variable (airquality$ temp).
>install.packages("ggplot2")
>library(ggplot2)
>install.packages("dplyr")>library(dplyr)
Basic Study of the Data
First we will have a look at the 'airquality' data set. Please note that we are not performing any data wrangling here.
>airquality

> as_tibble(airquality) # tibble::as_tibble similar to dplyr :tbl_df

> str(airquality) # Structure of the dataset

> summary(airquality) #Summary statistics of the dataset

Now from the above dataset, we will consider only the Temp variable to visualize with Histogram, as it can study the frequency distribution of one quantitative variable.
Creating a Histogram for the variable Temp (airquality$temp) using qplot() function :
In ggplot2 package we have two options to make a Histogram, we can either use the qplot() function(similar to the graphics::hist() function) or ggplot() function.
>qplot(airquality$Temp, geom="histogram")
Or>ggplot(data=airquality, aes(Temp)) + geom_histogram()
here, geom : The type of geomentry (the Shape)
aes : The aes() function do the Aesthetic mappings describe how variables in the data are mapped to visual properties (aesthetics) of geoms.
This function also standardizes aesthetic names by converting color to colour (also in the substrings, e.g. point_color to point_colour) and translating old style R names to ggplot names (eg. pch to shape, cex to size).
This function also standardizes aesthetic names by converting color to colour (also in the substrings, e.g. point_color to point_colour) and translating old style R names to ggplot names (eg. pch to shape, cex to size).
Output:

Notes:
The qplot() function is a simpler but less customizable wrapper around ggplot.
The ggplot() allows for maximum features and flexibility.
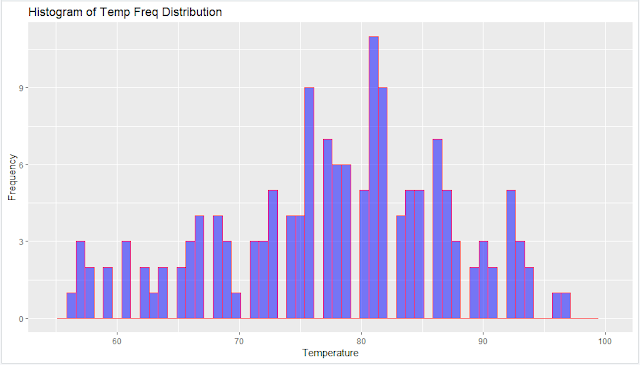
Enhancing the Histogram with use of more properties in qplot() function :
Now we will enhance the above Histogram by adding the following additional properties.. main - tiltle of the Visual,
binwidth - width between the bins in each class ( eg: 3 bins between the Class 70-80, as showing in the below Histogram)
xlab - label of x-axis,
ylab - label of y-axis,
fill - the color filling for the bars(bins),
col - the color for the margin of the bars,
alpha - the transparency of the fill; the value of alpha is between 0 (fully transparent) and 1 (opaque).
xlim - the limits for the range of the distribution of x-axis values
ylim - the limits for the range of the distribution of y-axis values
geom="histogram",
binwidth = 0.75,
main = "Histogram of Temp Freq Distribution",
xlab = "Temperature",
ylab = "Frequency",
fill=I("blue"),
col=I("red"),
alpha=I(0.5),
xlim=c(55,100) )
Notes:
The I() function inhibits the interpretation of its arguments. In this case, the col argument is affected. Without it, the qplot() function would print a legend, saying that "col = 'red' ".
The qplot() function also allows you to set limits on the values that appear on the x-and y-axes. Just use xlim and ylim, in the same way as it was described for the hist() function.
If we don't specify the binwidth, xlim, ylim, then R will automatically decide based on the data distribution.
Output :
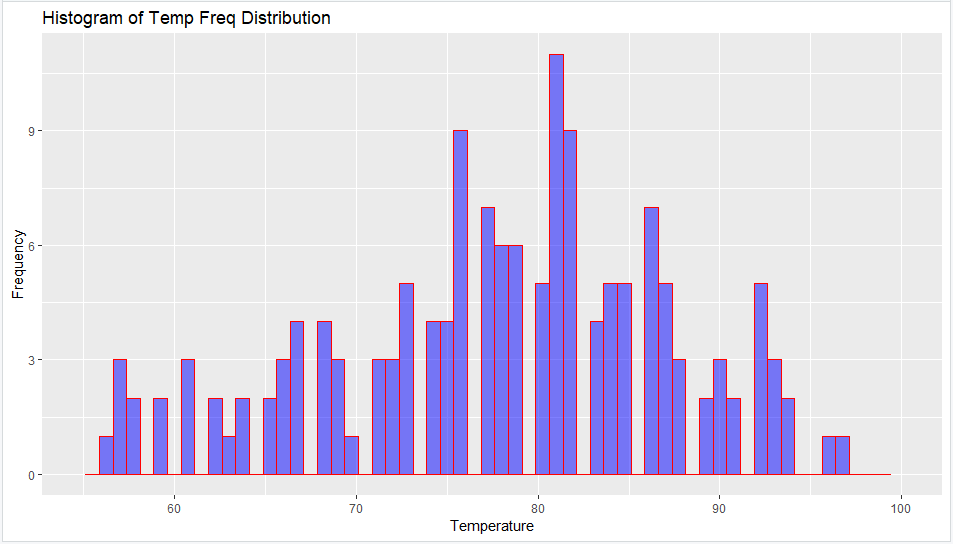
Now we will create a similar Histogram as above using ggplot () function as follows...
>ggplot(data=airquality, aes(Temp)) +
geom_histogram(breaks=seq(55, 100, by = 0.75),
col="blue",
fill="yellow",
alpha = 0.5) +
labs(title="Histogram of Temp Freq Distribution") +
theme(plot.title = element_text(hjust = 0.5)) +
labs(x="Temperature", y="Frequency") +
xlim(c(55,100)) +
ylim(c(0,12))
>ggplot(data=airquality, aes(Temp)) +
geom_histogram(breaks=seq(55, 100, by = 0.75),
col="blue",
fill="yellow",
alpha = 0.5) +
labs(title="Histogram of Temp Freq Distribution") +
theme(plot.title = element_text(hjust = 0.5)) +
labs(x="Temperature", y="Frequency") +
xlim(c(55,100)) +
ylim(c(0,12))
Notes :
We can adjust the bin width with breaks.
labs() function is used specify the titles for main, x-axis and y-axis.
theme() function is used to align the main title to center.
Output:

Adding the Bin Count in the Histogram :
We can add the bin count to the histogram using the stat_bin() function, as defined below.
> ggplot(data=airquality, aes(x=Temp,y=..count..)) +
geom_histogram(col="blue",
fill="yellow",
alpha = 0.5) +
stat_bin(aes(label=..count..),geom="text", bins=30,vjust=-0.5) +
labs(title="Histogram of Temp Freq Distribution") +
theme(plot.title = element_text(hjust = 0.5)) +
labs(x="Temperature", y="Frequency") +
xlim(c(55,100))
Output :

Coloring the Bins based on the Frequency/Count :
We can also fill the bins with colors according to the frequency/count of numbers that are presented in the y-axis, something that is not possible in the qplot() function. geom_histogram(col="blue",
fill="yellow",
alpha = 0.5) +
stat_bin(aes(label=..count..),geom="text", bins=30,vjust=-0.5) +
labs(title="Histogram of Temp Freq Distribution") +
theme(plot.title = element_text(hjust = 0.5)) +
labs(x="Temperature", y="Frequency") +
xlim(c(55,100))
Output :

Coloring the Bins based on the Frequency/Count :
The default color scheme is blue (if you use only aes(fill=..count..)). If you wants to specify desired colors for the bins with low and high frequency values from the y-axis, we should add some additional properties to the code:
the scale_fill_gradient, along with aes(fill=..count..).
the scale_fill_gradient, along with aes(fill=..count..).
For example, if we wants to add the yellow color for bins with low frequency values, red color for the bins with higher frequency values, we can do it using the following code...
>ggplot(data=airquality, aes(Temp)) +
geom_histogram(breaks=seq(55, 100, by = 0.75), col="blue",
alpha = 0.5) +
aes(fill=..count..) +
scale_fill_gradient("Freq.legend", low = "yellow", high = "red") +
labs(title="Histogram of Temp Freq Distribution") +
theme(plot.title = element_text(hjust = 0.5))+
labs(x="Temperature", y="Frequency") +
xlim(c(55,100)) +
ylim(c(0,12))
Output :


Adding the Trend line on Histogram with Density :We will use the aes(y=..density..) function inside the geom_histogram() function to add the Density values on y-axis, instead of the Frequency/Count.
Next we will add the geom_density(col="purple") function to add a trend line of purple color over bins.
>ggplot(data=airquality, aes(Temp)) +
geom_histogram(aes(y =..density..),
breaks=seq(55, 100, by = 1.0),
col="blue",
fill="yellow",
alpha = 0.5) +
geom_density(col="purple")+
labs(title="Histogram of Temp Freq Distribution") +
theme(plot.title = element_text(hjust = 0.5) ) +
labs(x="Temperature", y="Density") +
xlim(c(55,100))
Output :

Difference between Frequency and Density in a Histogram:
Now will see the difference between the Frequency(Count) and the Density in a Histogram using the below example.
Suppose we have the observations X1,X2,…,X100 is a random sample of size n from a normal distribution with mean μ=100 and standard deviation σ=12.
Also, we have bins (intervals) of equal width, which we use to make a histogram.
Frequency Histogram :

Density Histogram :
The vertical scale of a 'density histogram' shows units that make the total area of all the bars add to 1. This makes it possible to show the density curve of the population using the same vertical scale. From above, we know that the tallest bar has 30 observations, so this bar accounts for the relative frequency (30/100)=0.3 of the observations. The width of this bar is 10, its density is 0.03 and its area is 0.03(10)=0.3.
The density curve(trend line) of the distribution Norm(100,15) is shown on the histogram. The area beneath this density curve is also 1.(By definition, the are beneath the density function is always 1.)
Optionally, we have added tick marks below the histogram to show the locations of the individual observations.

If the frequency of the ith bar is fi, then its relative frequency is ri=(fi/n), where n is a sample size. Its density is di=(ri/wi), where wi is its width. Generally we should make the density histogram only if each bar has the same width.
--------------------------------------------------------------------------------------------------------
Thanks, TAMATAM ; Business Intelligence & Analytics Professional
--------------------------------------------------------------------------------------------------------
Thanks, TAMATAM ; Business Intelligence & Analytics Professional
--------------------------------------------------------------------------------------------------------


No comments:
Post a Comment
Hi User, Thank You for visiting My Blog. If you wish, please share your genuine Feedback or comments only related to this Blog Posts. It is my humble request that, please do not post any Spam comments or Advertising kind of comments, which will be Ignored.